

What is JSON
JSON -( JavaScript Object Notation) is the format for the representation of data and is commonly used for the structure of data it is used for web development and API communication it is also lightweight and easy to read.
We can use JSON to integrate with many programming languages.
JSON supports many data types such as
Strings --> "Hello India" "Hello people"
Numbers --> 3, 6.5, -98, 1.3e10
Booleans --> true, false
Array --> ["hello", "guru"] [9, 0, 8,4 ]
Objects --> {"key" : "value" } { "age" : 27 }
null --> null
A JSON file can be created with the extension ".json." file.json
to create the JSON file we need first open and close curly braces { }, then we will put all key-value pairs inside.
every single key must be surrounded by a double quote followed by a colon and the value with a double quote.
if we have multiple value keys we use commas between every single key-value pairs
{
  "name": "Gurudath",
  "age": 27,
  "city": "Bangalore",
  "hobbies": ["reading", "singing", "traveling"],
  "address": {
    "street": "home town",
    "zipcode": "573302"
  }
}
# key value pairs separated by commas
Let's Learn JSON:
Here's a step-by-step guide to working with JSON in Python:
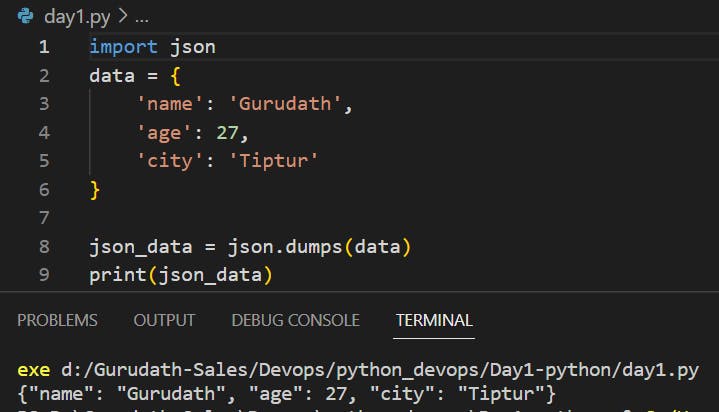
Step 1: Import the JSON module To begin, you need to import the JSON module in Python. The JSON module provides functions for working with JSON data.
import json
Step 2: JSON Serialization (Encoding)
JSON serialization refers to the process of converting a Python object into a JSON string. The json module provides the json.dumps() function to accomplish this.
data = {
    'name': 'Gurudath',
    'age': 27,
    'city': 'Tiptur'
}
json_data = json.dumps(data)
print(json_data)
In the above example, we have a Python dictionary data representing some data. The json.dumps() function converts this dictionary into a JSON string. The output will look like this:
{"name": "Gurudath", "age": 27, "city": "Tiptur"}
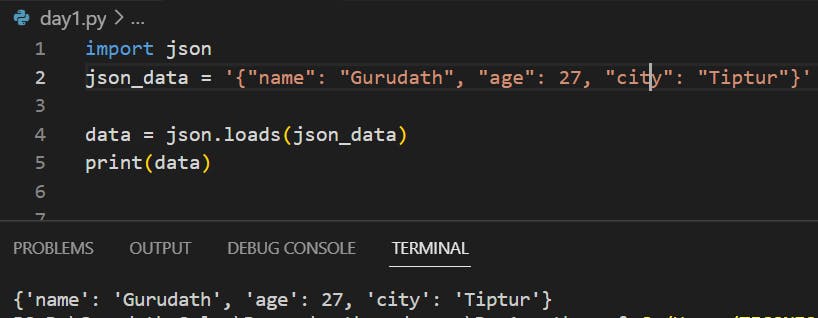
Step 3: JSON Deserialization (Decoding)
JSON deserialization is the process of converting a JSON string back into a Python object. The json module provides the json.loads() function for this purpose.
import json
json_data = '{"name": "Gurudath", "age": 27, "city": "Tiptur"}'

data = json.loads(json_data)
print(data)
In the above example, we have a JSON string json_data. The json.loads() function converts this string into a Python dictionary. The output will be:
{'name': 'Gurudath', 'age': 27, 'city': 'Tiptur'}
Step 4: Working with JSON Files You can also read and write JSON data from/to files using the json.load() and json.dump() functions, respectively.
Writing JSON to a file:
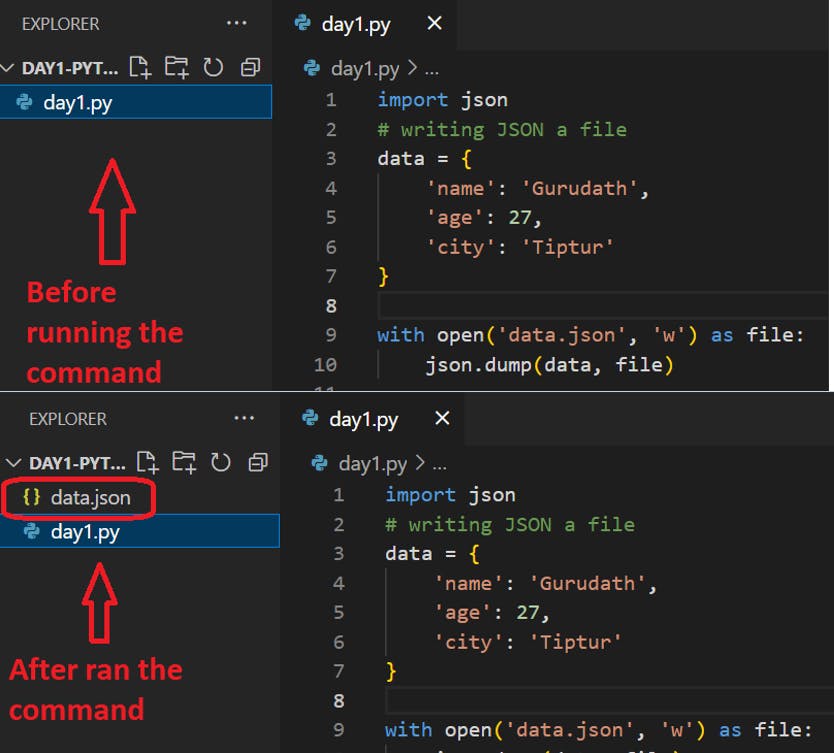
To write JSON data to a file, you need to open the file in write mode using the open() function. If the file doesn't exist, it will be created. If it already exists, its contents will be overwritten. You can use the json.dump() function to write the JSON data to the file. The json.dump() function takes the data to be written and the file object as arguments. After writing the JSON data, make sure to close the file using the close() method of the file object or by using a with statement.
import json
# writing JSON a file
data = {
    'name': 'Gurudath',
    'age': 27,
    'city': 'Tiptur'
}

with open('data.json', 'w') as file:
    json.dump(data, file)
In the above code, 'data.json' is the name of the file you want to write the JSON data to. The 'w' parameter indicates that you're opening the file in write mode. The json.dump() function writes the JSON representation of the data dictionary to the file.
Reading JSON from a file:
To read JSON data from a file, you need to open the file in read mode using the open() function. The file should contain valid JSON data.
You can use the json.load() function to load the JSON data from the file into a Python object. The json.load() function takes the file object as an argument.
Once the JSON data is loaded, you can work with it as a Python object, such as a dictionary or a list.
After you have finished working with the JSON data, make sure to close the file using the close() method of the file object or by using a with statement. This ensures that system resources are properly released.
import json
# Reading JSON from a file

with open('data.json', 'r') as file:
    data = json.load(file)
    print(data)
    file.close()
Remember to adapt the file paths and names to match your specific use case.


hmmmmmmmmmmmmm, I can feel your thought........
Okay, let's see how our DevOps engineer is using JSON.
Let's say you're working on a deployment automation script that provisions virtual machines in a cloud environment. You want to store configuration details for each virtual machine, such as the VM name, CPU count, memory size, and disk size. Instead of hardcoding these values directly in your script, you can use a JSON file to store and read the configuration.
import json

# Configuration data
vm_config = {
    'vm1': {
        'cpu': 2,
        'memory': 4096,
        'disk': 100
    },
    'vm2': {
        'cpu': 4,
        'memory': 8192,
        'disk': 200
    },
    'vm3': {
        'cpu': 8,
        'memory': 16384,
        'disk': 500
    }
}

# Writing JSON data to a file
with open('vm_config.json', 'w') as file:
    json.dump(vm_config, file)
the above code creates the vm_config.json file which contain all the data of virtual machine(we are storing the details in json format.
Similarly if you want to reading the JSON data:
import json

# Reading JSON data from a file
with open('vm_config.json', 'r') as file:
    vm_config = json.load(file)

# Accessing VM configuration
for vm, config in vm_config.items():
    print(f"VM Name: {vm}")
    print(f"CPU: {config['cpu']} cores")
    print(f"Memory: {config['memory']} MB")
    print(f"Disk: {config['disk']} GB")
    print()
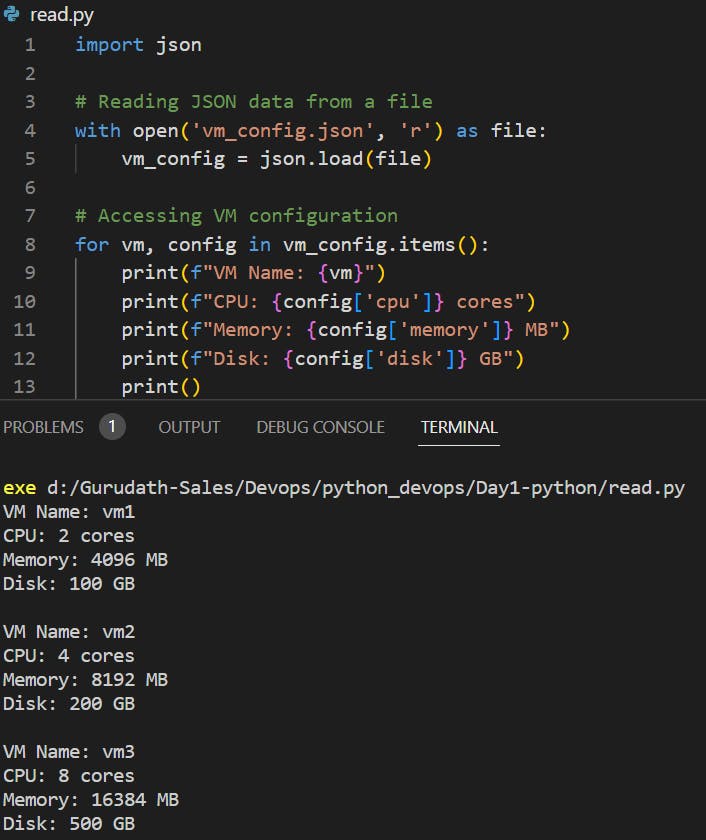
We read the JSON data from the 'vm_config.json' file using the json.load() function. The JSON data is loaded into the vm_config variable, which we can then iterate over to access the configuration details for each virtual machine.
The code above demonstrates how you can store and retrieve configuration details from a JSON file. You can easily modify the JSON file to update the VM configurations without modifying the code itself, providing flexibility and ease of maintenance.
JSON files can be used in various ways in a DevOps context, such as storing configuration settings, defining infrastructure templates, or exchanging data between different systems or microservices. The flexibility and simplicity of JSON make it a popular choice for structuring and managing data.
What Is YAML?
YAML stands for YAML Ain’t Markup Language.
It is similar to JSON, but it is a much more human-readable format used for exchanging data between systems and storing configuration data.
A YAML file can be created with the extension ".yml or .yaml."
Let's Learn YAML:
Step 1: Install the PyYAML Library
pip install pyyaml
Step 2: Import the PyYAML Module
After installing PyYAML, you can import the yaml module in Python to work with YAML data.
import yaml
Step 3: YAML Serialization (Dumping)
YAML serialization refers to the process of converting Python objects into YAML format. The yaml.dump() function is used for this purpose.
data = {
    'name': 'Gurudath',
    'age': 27,
    'city': 'Tiptur'
}

yaml_data = yaml.dump(data)
print(yaml_data)
we have a Python dictionary data representing some data. The yaml.dump() function converts this dictionary into a YAML string. The output will look like this:
age: 25
city: New York
name: John Doe

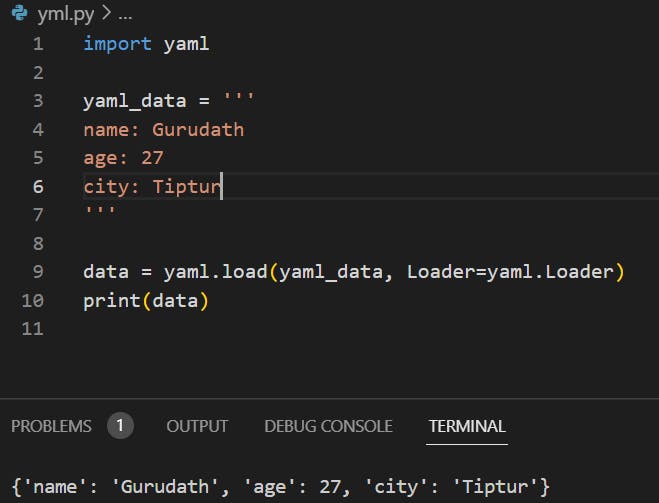
Step 4: YAML Deserialization (Loading)
YAML deserialization is the process of converting YAML data into Python objects. The yaml.load() function is used for this purpose.
import yaml

yaml_data = '''
name: Gurudath
age: 27
city: Tiptur
'''

data = yaml.load(yaml_data, Loader=yaml.Loader)
print(data)
In this code, the YAML data is directly assigned to the yaml_data variable as a multiline string. The yaml.safe_load() function is then used to parse and load the YAML data from the string into a Python dictionary.
Step 5: Working with YAML Files- similarly like Json you can read and write the yaml file also.
import yaml

# Writing YAML data to a file
data = {
    'name': 'Gurudath',
    'age': 27,
    'city': 'Tiptur'
}

with open('data.yaml', 'w') as file:
    yaml.safe_dump(data, file)
# Reading YAML from a file
with open('data.yaml', 'r') as file:
    data = yaml.safe_load(file)
    print(data)
For Devops Engineer.
Let's say you are working on a deployment automation script for a microservices-based application. You need to manage the configuration for each microservice, including its name, port, database connection details, and environment-specific settings. Instead of hardcoding these configurations in your script, you can use a YAML file to store and manage them.
services:
  - name: service1
    port: 8000
    database:
      host: localhost
      port: 5432
      username: db_user1
      password: db_password1
  - name: service2
    port: 8080
    database:
      host: localhost
      port: 5432
      username: db_user2
      password: db_password2
In this example, we have a YAML file named config.yaml that represents the configuration for two microservices, service1 and service2. Each microservice has properties like name, port, and database connection details.
As a DevOps engineer, you can utilize this YAML file in your deployment script to load the configuration dynamically:
import yaml

# Load YAML configuration
with open('config.yaml', 'r') as file:
    config = yaml.safe_load(file)

# Deploy microservices
for service in config['services']:
    name = service['name']
    port = service['port']
    db_host = service['database']['host']
    db_port = service['database']['port']
    db_username = service['database']['username']
    db_password = service['database']['password']

    # Deployment logic for each microservice
    print(f"Deploying {name} on port {port} with DB: {db_host}:{db_port} (username: {db_username})")

    # Additional deployment steps...

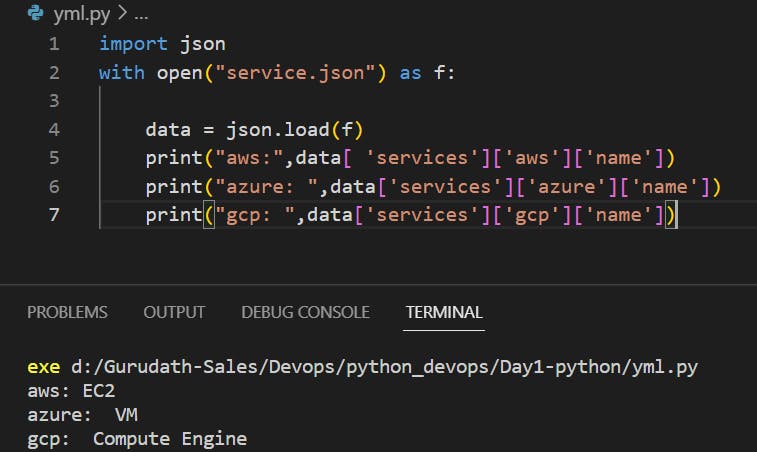
Tasks:
- Read a json file
services.jsonkept in this folder and print the service names of every cloud service provider.
Read YAML file using python, file
services.yamland read the contents to convert yaml to json.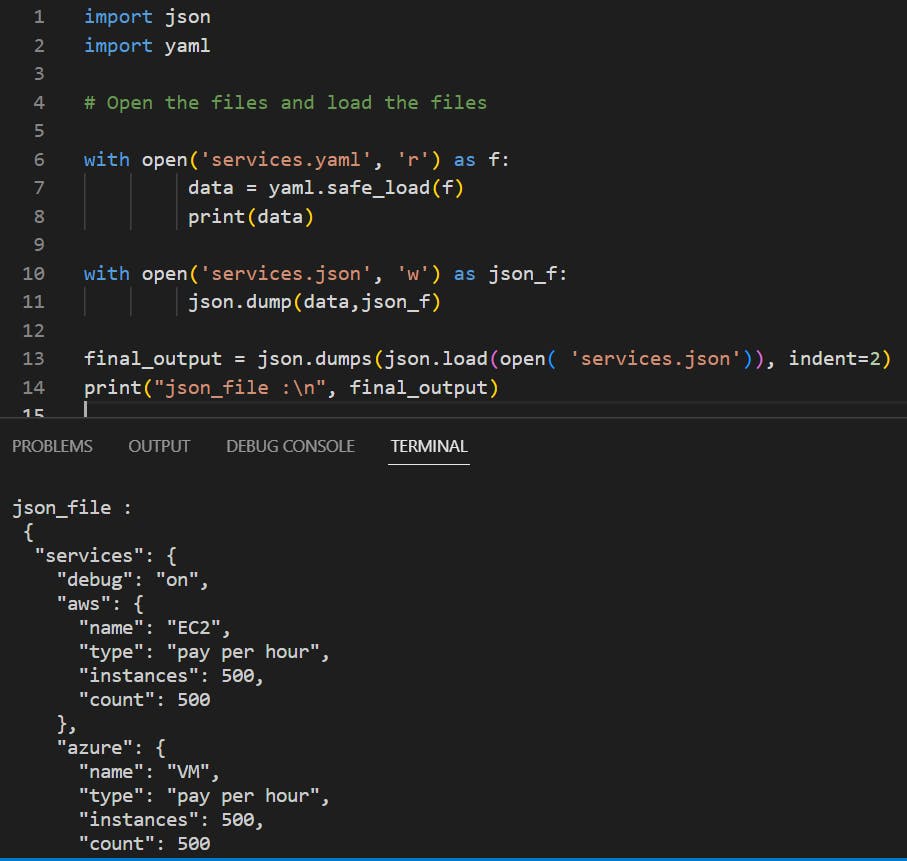
Hope this article is helpful in providing a better understanding.
Happy Learning!
Usefull Link: https://medium.com/globant/yaml-basic-to-advance-36a3046e3bf6